- /
- /
- /
How to Customize Polling Slides
PointSolutions Desktop offers several static and interactive objects you can add to slides. Two useful objects are the Countdown Indicator, Correct Answer Indicators, and Response Grid.
Part I. Countdown Indicator
This timer provides a visual cue that polling is about to close as it counts down to zero. When the countdown expires, the indicator disappears and polling is automatically closed.
- Launch PointSolutions Desktop and click PowerPoint Polling.
- Click Object on the PointSolutions Ribbon and select Countdown.
- Select one of the 5 countdown timers.
Note: If you choose the adjustable countdown timer allows you to pause the countdown time during the polling as well as increase or decrease time at 5-second interval. - The indicator is placed on the slide. You can move or resize to better fit the slide.
- To change the length of the countdown, click on the number and set it to the desired countdown length. You can set sound if you want. Note: If you choose the adjustable

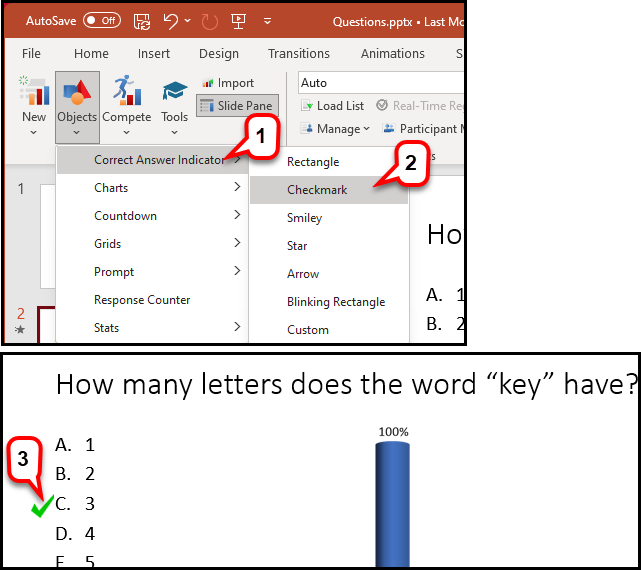
Part II. Correct Answer Indicator
A correct answer indicator allows participants to see the correct answer or answers after polling is closed. The indicator appears during a presentation when the slide is advanced after displaying the chart.
- Click Objects on thePointSolutions Ribbon and mouse over Correct Answer Indicator.
- Select a Correct Answer Indicator.
- PS places this indicator on your slide. This indicator will appear after polling is finished and you click to advance the slide.
Part III. Response Grid
A grid is an object that is overlaid on a slide during the presentation and indicates which participants have responded. A grid can be made to appear on each polling slide that is created.
- Click Objects on the PointSolutions Ribbon and Select Grids>Table
- While polling is open, hold the mouse over the grid to access the grid controls. Click the left or right arrows below Rotate to view more participants. Click the left or right “A” to increase or decrease font size. The font size will increase or decrease by one size for each click. The minimum font size is 12 and the maximum font size is 48.
