- /
- /
- /
- /
How to use Sign Language View in Microsoft Teams
Sign Language View in Microsoft Teams is a meeting experience designed to enhance communication for signers, including people who are deaf or hard of hearing, sign language interpreters, and others who use sign language.
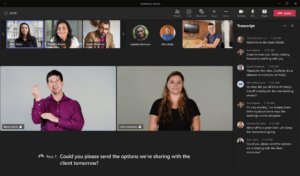
Sign Language View prioritizes signers by keeping them consistently visible on-screen during meetings.
Key features:
Static Placement: Users can prioritize up to two signers’ video streams, placing them at the center stage. The prioritized video streams appear at the right aspect ratio and highest quality.
Activation Options:
- On-the-Fly: Enable Sign Language View during a meeting.
- Persistent Setting: Set it to persist across all your calls.
Personalized Experience:
- Designated signers remain visible if their video is on.
- Other participants can be pinned or spotlighted without affecting the signers’ view.
- Enabling Sign Language View will not alert other participants or alter their meeting view.
External Interpreters: Even if an interpreter is outside your organization, you can still designate them as a signer within the meeting.
Content Sharing: When someone shares content, the prioritized signer’s video remains larger and higher quality, adjusting to a different part of the stage.
PLEASE NOTE: Microsoft does not directly provide sign language interpreters for meetings. Instead, it is the responsibility of meeting organizers or participants to arrange sign language interpretation in advance.
How to Enable Sign Language View
Please follow the steps below to activate Sign Language View in your Microsoft Teams and assign a signer before a meeting.
Assign interpreters before a meeting.
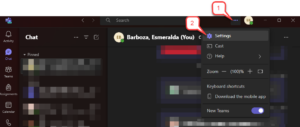
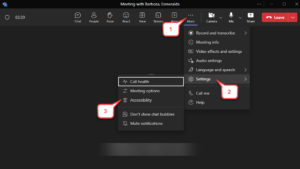
- Select the ellipse (…) next to your profile.
- Select Settings.
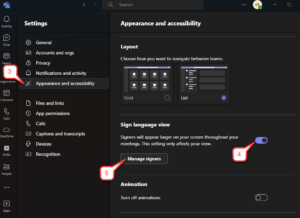
- Choose Appearance and accessibility from the Settings menu.
- Switch on the Sign language view toggle key.
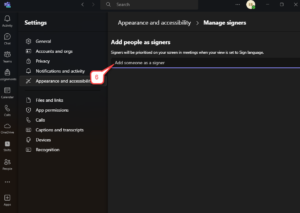
- To add someone as an interpreter, select Manage signers.
- Type the interpreter’s name and then select it from the search results list.
How to Assign an Interpreter during a Meeting
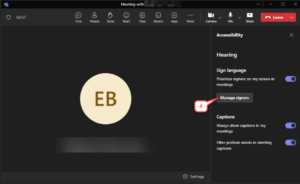
PLEASE NOTE: The options described in the following steps are accessible only if you have enabled the Sign Language option within the Accessibility tab of the application settings.
Follow the steps below to assign interpreters during a meeting from the Accessibility tab.
- Select More
- Select Settings
- Select Accessibility
- Select Manage signers
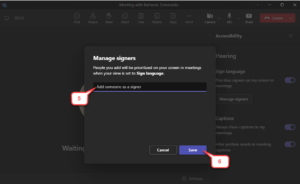
- Start typing the interpreter’s name and select it from the search results list.
- When ready, select Save.
Assign interpreters during a meeting from the Participants list
- Select People
- Find the person you want to assign as a signer and then select More options.
- Select Make a signer.
Add a signer from the Participant context menu
- Select More options next to the participant’s name in their video
- Select Make a signer.
PLEASE NOTE: Be aware that when you’re in Sign Language view and attempting to view the content shared by the presenter on screen, it’s advisable to maximize your screen and close the chat/participants menu. Doing so will optimize the view by maximizing both the signer’s video and the content shared by the presenter.
How to Designate a Signer for Everyone
If you wish to assign a sign language interpreter for everyone present in the meeting, it’s recommended to Spotlight the interpreter’s video within the Microsoft Teams meeting.
PLEASE NOTE: Spotlighting a video is not possible when your view is set to Large gallery or Together mode.
To highlight someone else’s video in a meeting, you have a couple of options:
Option one:
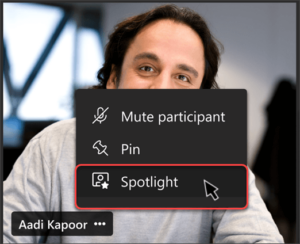
Right-click on the person’s video and choose Spotlight from the menu. If someone else is already spotlighted, it will say Add spotlight instead.
Option two: Alternatively, select Show participants to view a list of everyone in the meeting. Find the person’s name whose video you want to highlight, right-click on their name, and select Spotlight.
To end the spotlight, simply right-click again and select Stop spotlighting. If multiple people are spotlighted, you can stop spotlighting everyone at once under Show participants.
To spotlight your own video, you can do it in two ways:
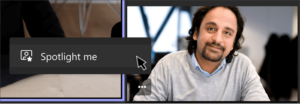
- Right-click on your video and choose Spotlight me.
- Or select Show participants, right-click on your name, and click Spotlight me.
To exit the spotlight, right-click again and choose Stop spotlighting.
To explore these features further please visit this link Use Sign Language View in Microsoft Teams – Microsoft Support.