- /
- /
- /
- /
- /
- /
- /
Publisher Tools in Canvas
This guide shows how to access publisher tools in your Canvas course. You can also preview placements of these tools in Canvas by going into your course and clicking Settings>Apps>View App Configurations>click i. For specific questions about how to access content in a tool, please contact your publisher representative.
McGraw Hill Connect LTIA
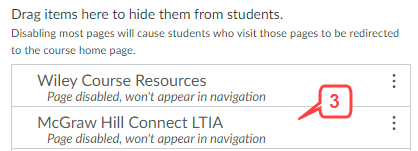
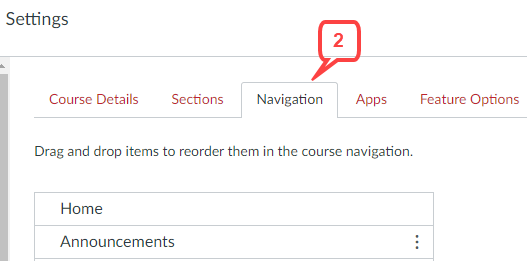
Option 1: Add to course navigation- Click Settings located in the course navigation menu on the left.
- Click the Navigation tab located on the top.
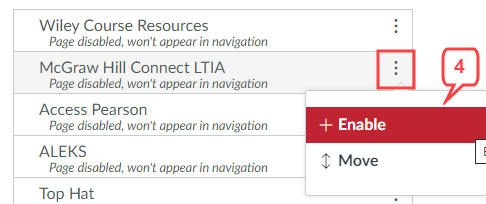
- Scroll down to the hidden set of items and look for McGraw Hill Connect LTIA.
- Click the 3 dots and select Enable. McGraw Hill Connect LTIA will be placed in the available set of items.
- You can also drag and drop the item in the available set of items.
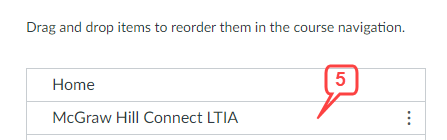
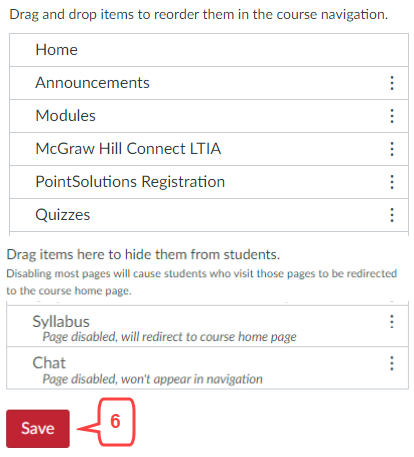
- Click Save.
- McGraw Hill Connect LTIA will appear in the course navigation menu.
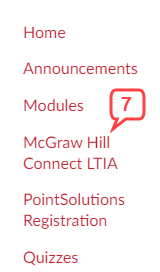
- Click McGraw Hill Connect LTIA to access Connect content.
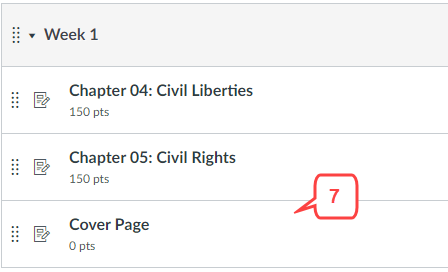
- Once the content is synced it will create a new module called, ‘New Connect Content.’


Option 2: Add into a module (McGraw Hill Connect LTIA)
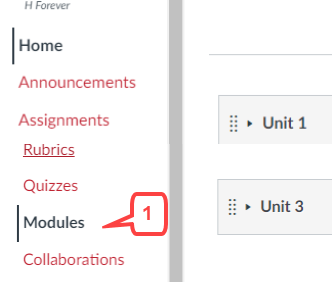
- Click Home or Modules in the course navigation menu on the left.
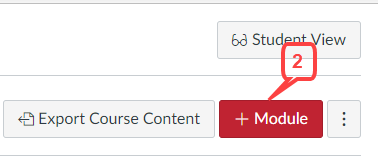
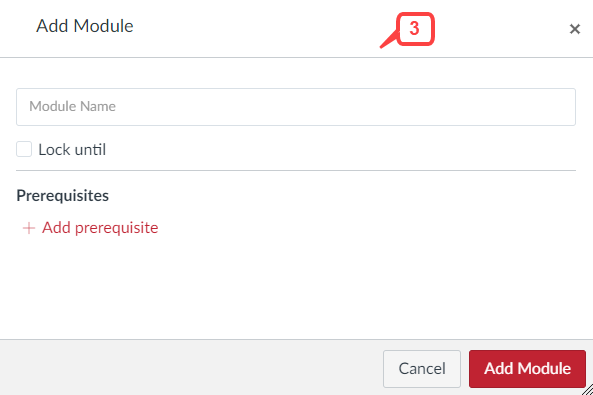
- Add a new module by clicking +Module button located in the top right part of the screen. If you are using an existing module, go to step 4.
- Follow the prompts to add a new module.
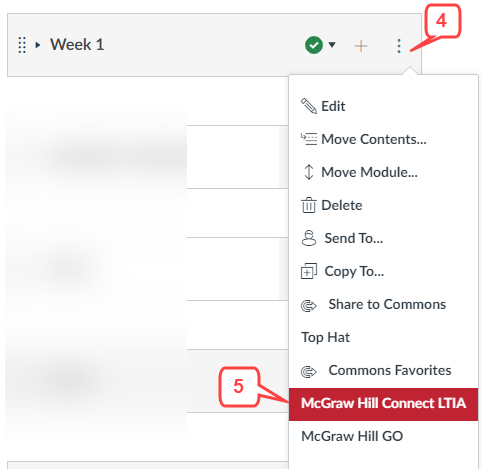
- Click on the 3 dots located in the header area of the module.
- Select McGraw Hill Connect LTIA from the drop-down menu.
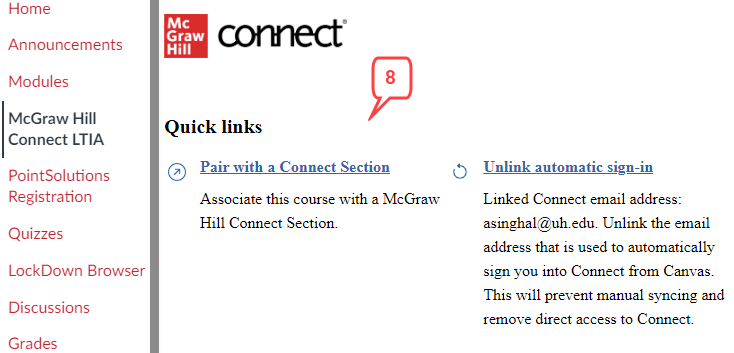
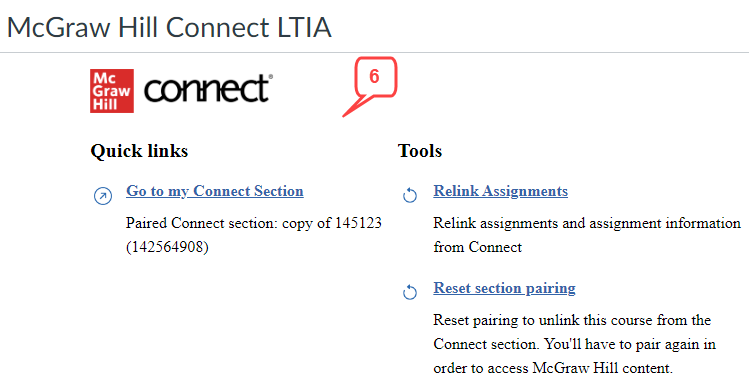
- You will be connected to the portal. Follow the prompts on the portal to select content.
- Once the content has been added it will show in the module.
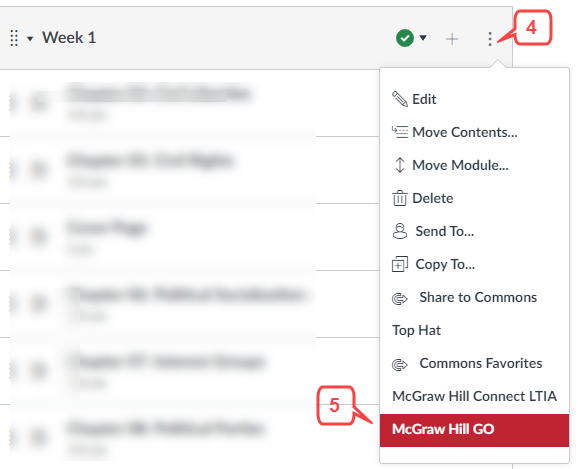
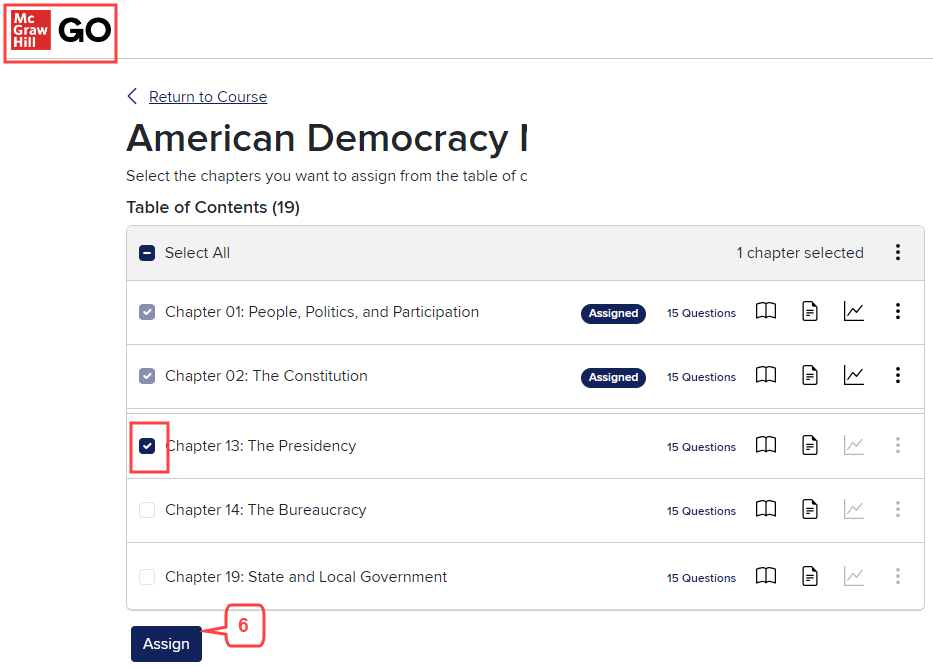
Option 3: Add into a module (McGraw Hill GO)
Option 2: Add into a module using External Tool option
- Click Home or Modules in the course navigation menu on the left.
- Add a new module by clicking +Module button located in the top right part of the screen. If you are using an existing module, go to step 4.
- Follow the prompts to add a new module.
- Click on the 3 dots located in the header area of the module.
- Select McGraw Hill GO from the drop-down menu.
- You will be connected to the portal. Follow the prompts on the portal to select content.
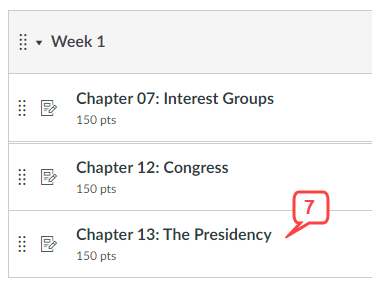
- Once the content has been added it will show in the module.
Cengage LTI Advantage
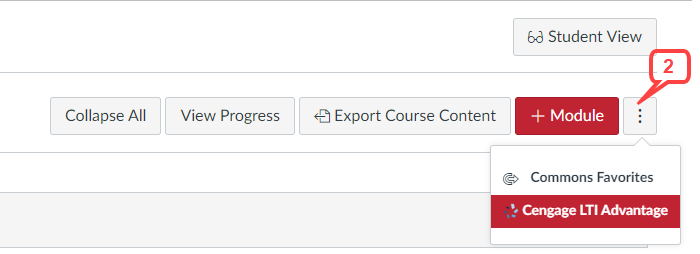
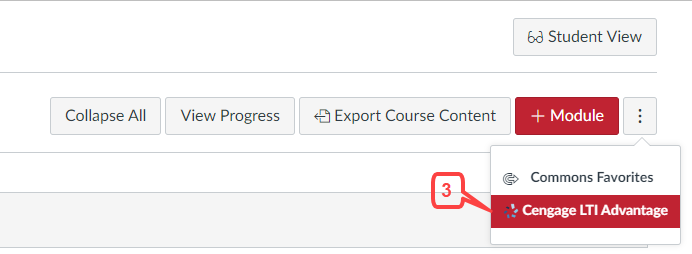
Option 1: Add as a module- Click Home or Modules in the course navigation menu to access Modules index page.
- Click the 3 dots located in the top right part of the screen, next to +Module button.
- Click Cengage LTI Advantage in the drop-down menu.
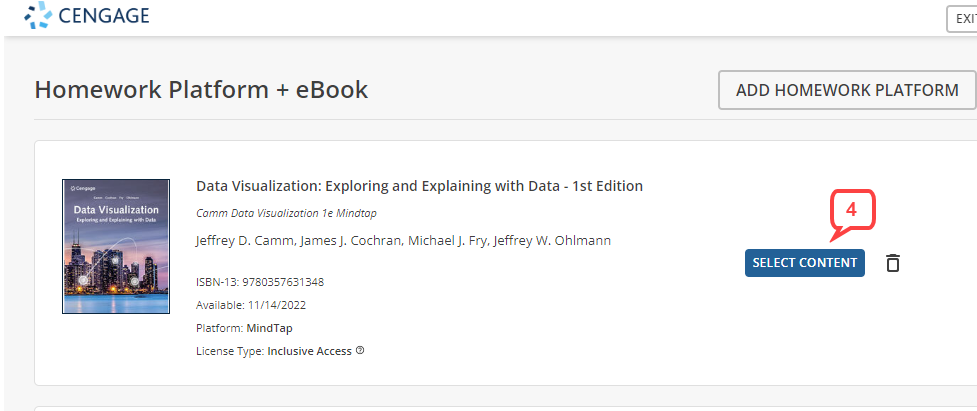
- You will be connected to the portal. Click Select Content to choose content.
- The content will be added as a new module.

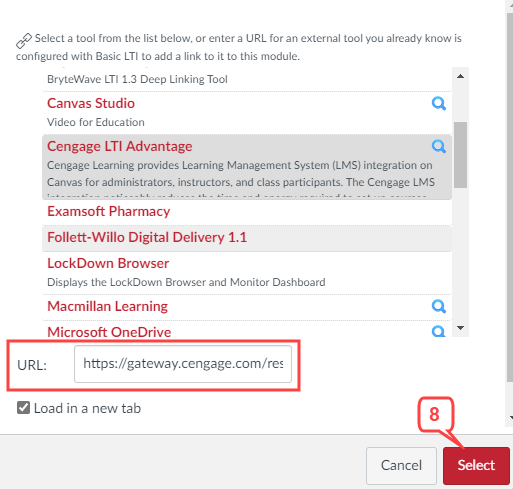
Option 2: Add into a module using External Tool option
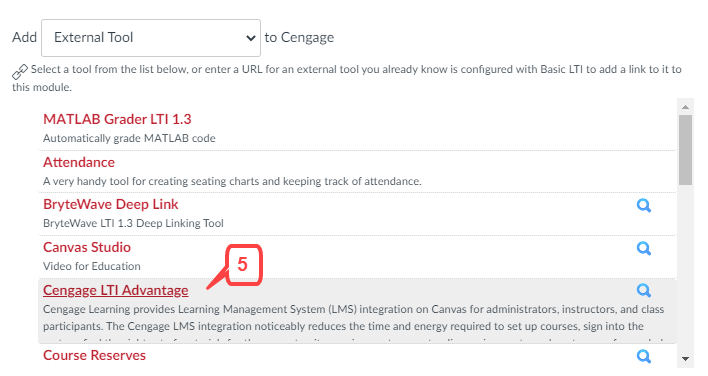
- Click Home or Modules in the course navigation menu to access Modules index page.
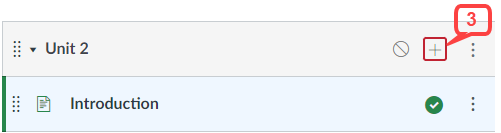
- Add a new Module by clicking on + Module button located in the top right part of the screen or go to an existing module.
- Click + in the module header.
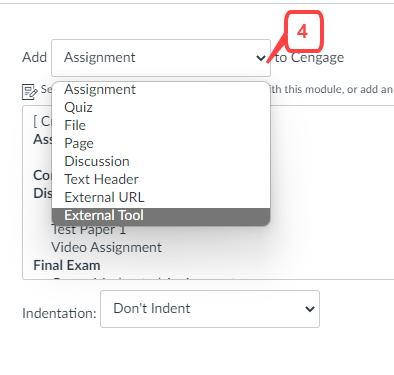
- Click the arrow and select External Tool.
- Click Cengage LTI Advantage.
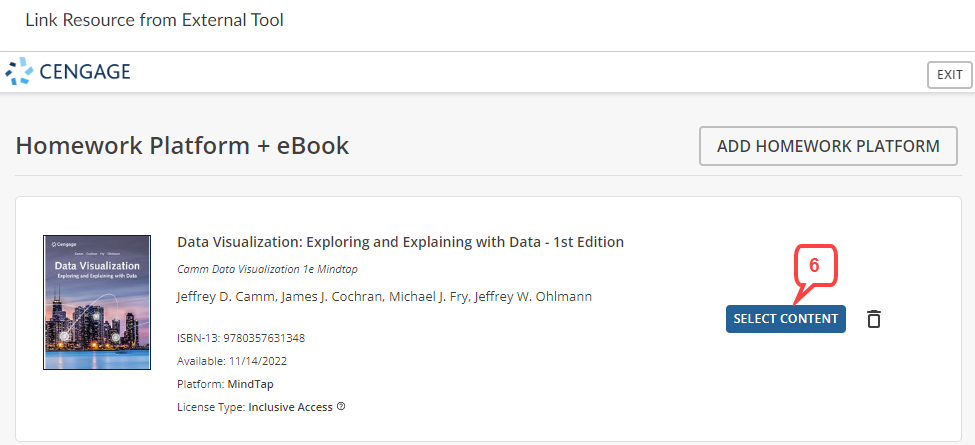
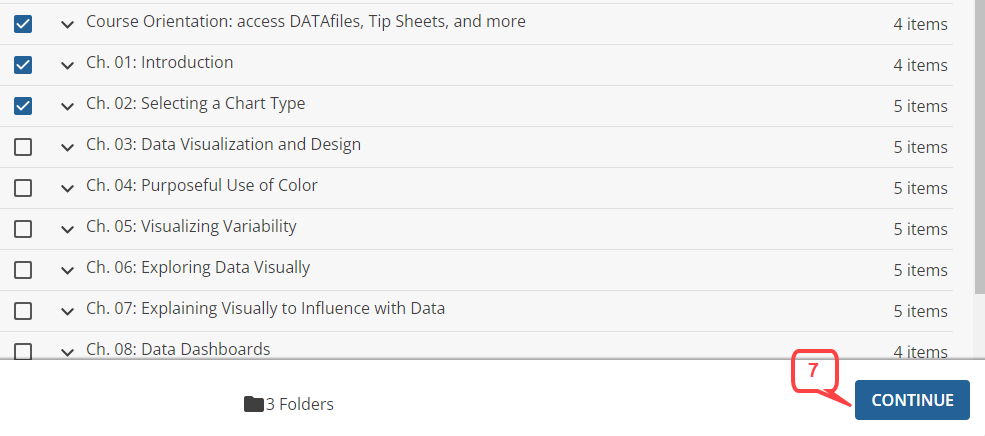
- ‘Link Resource from External Tool’ window will pop up. Click Select Content and follow the prompts.
- Once you have selected the content, click Continue.
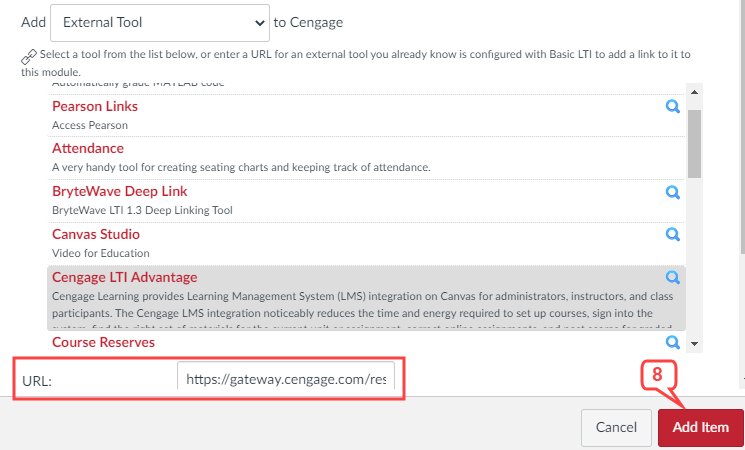
- You will be taken back to the External Tool screen with Cengage information. Click Add Item.
- The items will be added to the module.

Option 3: Add as an external tool in an assignment
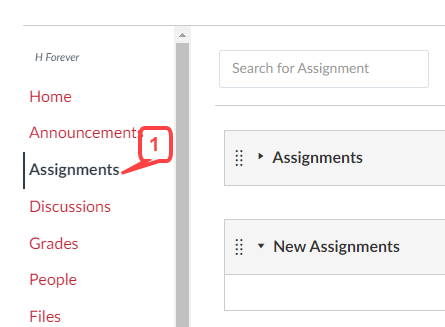
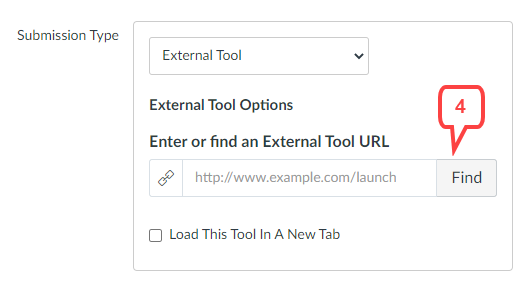
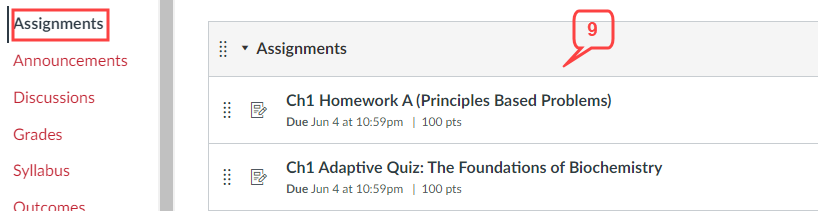
- Click Assignments in the course navigation menu to access Assignments page.
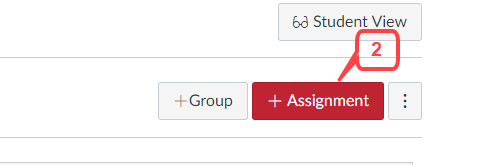
- Click + Assignment button to create a new assignment.
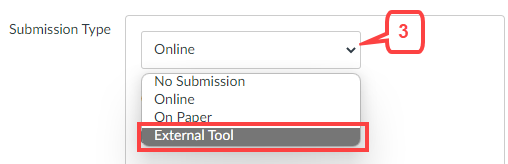
- For the Submission Type field click the arrow and select External Tool.
- Click Find.
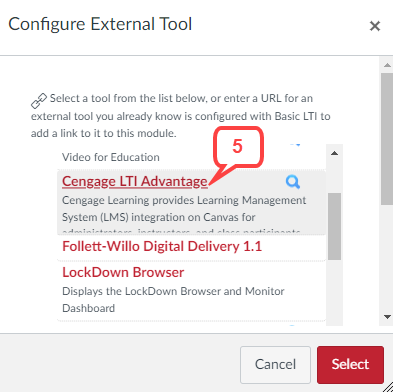
- Configure External Tool screen will pop up. Click Cengage LTI Advantage.
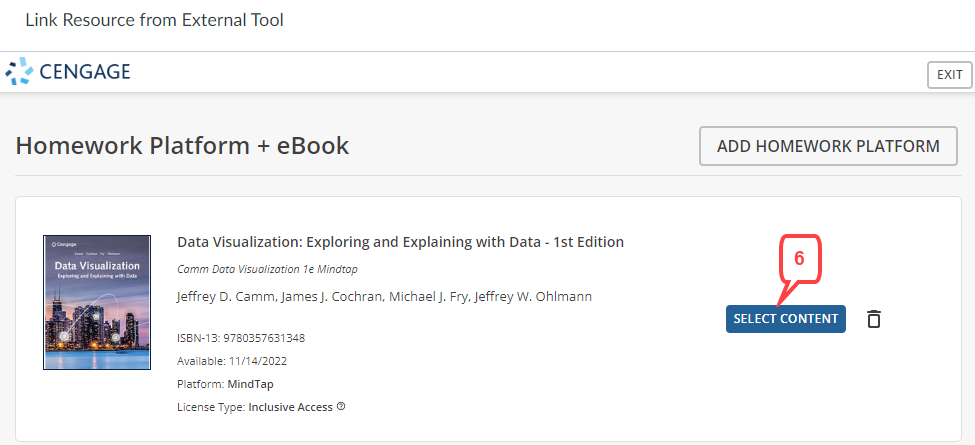
- The Cengage portal will load. Click Select Content.
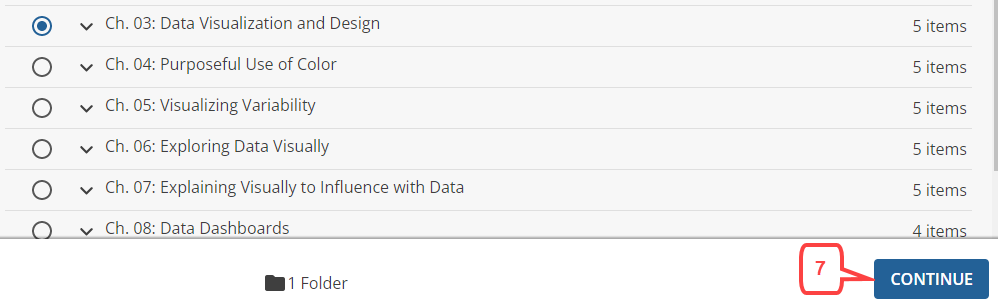
- After the content has been selected, click Continue.
- You will be taken back to the External Tool screen with Cengage information. Click Select.
- An External Tool URL will be added in the Submission Type box.

Pearson Access and Pearson Links
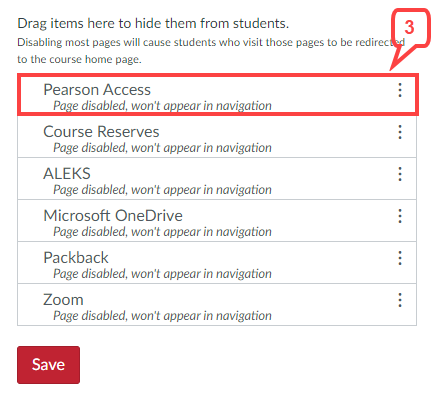
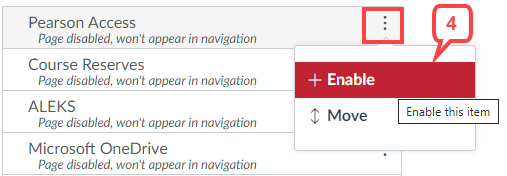
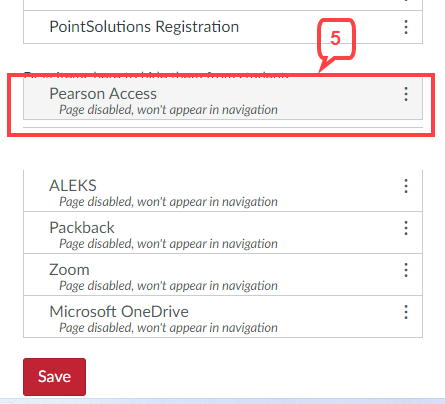
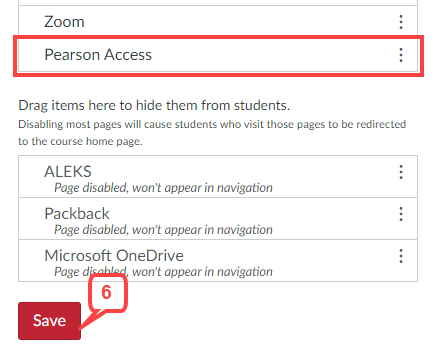
Option 1: Add to course navigation- Click Settings located in the course navigation menu on the left.
- Click the Navigation tab located on the top.
- Scroll down to the hidden set of items and look for Pearson Access.
- Click the 3 dots and select Enable. Pearson Access will be placed in the available set of items.
- You can also drag and drop the item in the available set of items.
- Click Save.
- Pearson Access will appear in the course navigation menu.
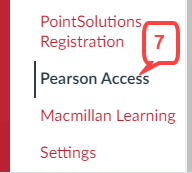
- Click Home or Modules in the course navigation menu to access Modules index page.
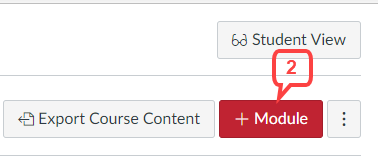
- Add a new Module by clicking on + Module button located in the top right part of the screen or go to an existing module.
- Click + in the module header.
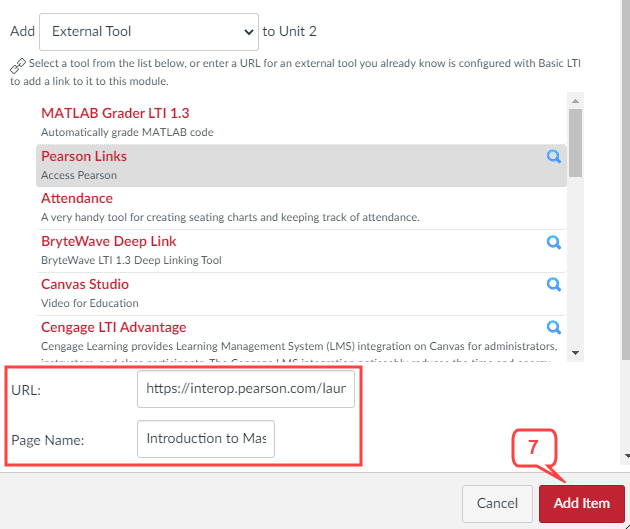
- Click on the arrow and select External Tool.
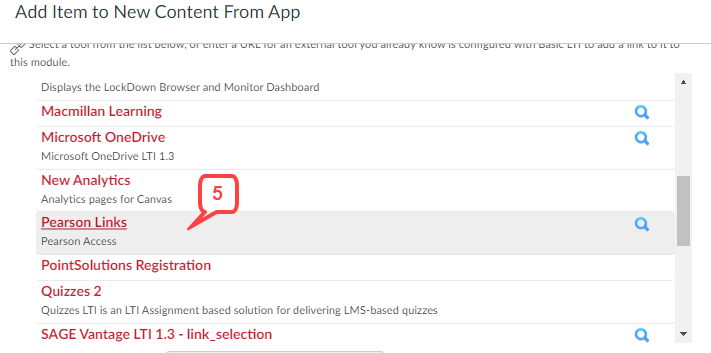
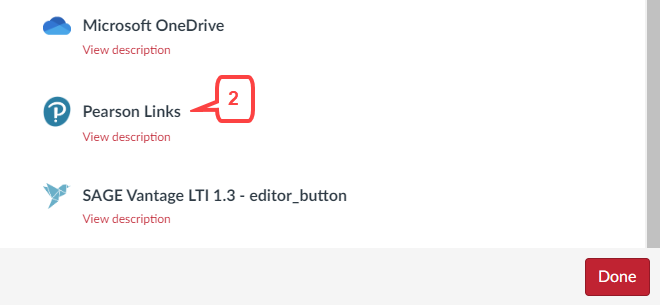
- Click Pearson Links.
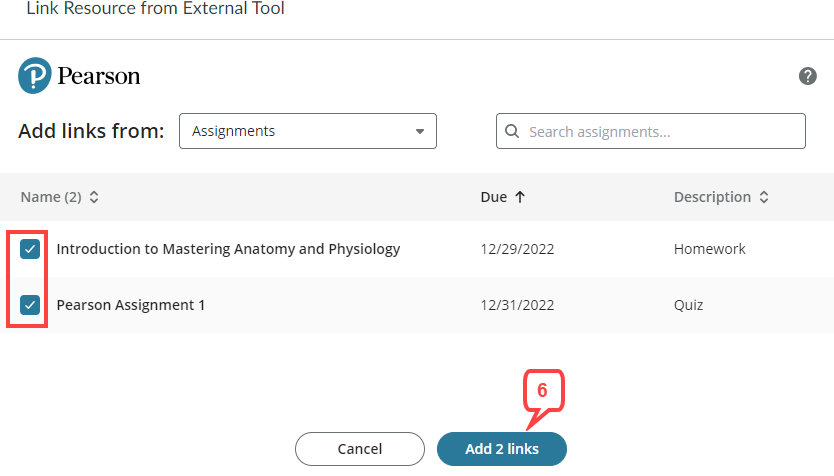
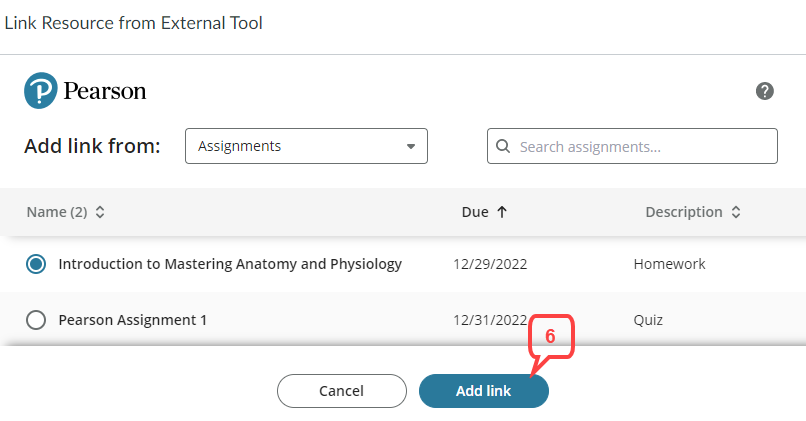
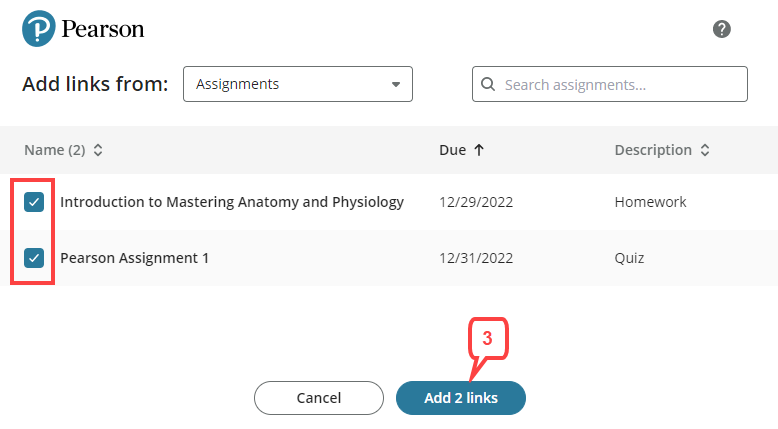
- ‘Link Resource from External Tool’ window will pop up. Select items you need and click Add links.
- You will be taken back to the External Tool screen with Pearson information. Click Add Item.
- Selected items will be added to the module.

Option 3: Add as an external tool in an assignment
- Click Assignments in the course navigation menu to access Assignments page.
- Click + Assignment button to create a new assignment
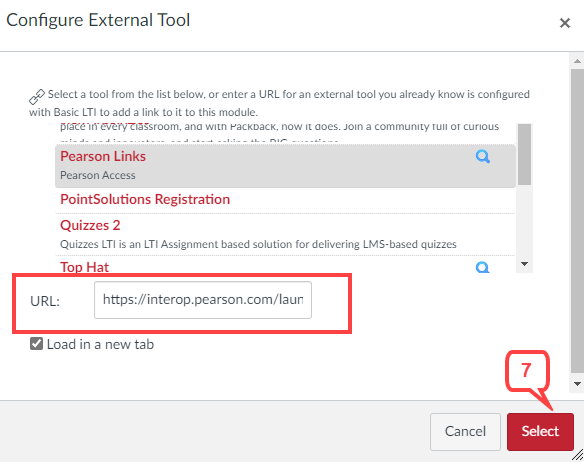
- For the Submission Type field, click the arrow, and select External Tool.
- Click Find.
- Click Pearson Links.
- ‘Link Resource from External Tool’ window will pop up. Select items you need and click Add links.
- You will be taken back to the External Tool screen with Pearson information. Click Select.
- An External Tool URL will be added in the Submission Type box.


Option 4: Access in Rich Content Editor
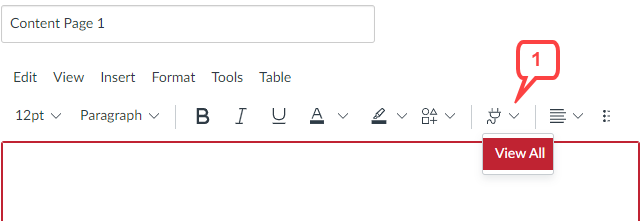
- Canvas tools, such as, Pages, Assignments, Announcements provide a rich content editor that has a ‘plug-in’ for applications. Click the plug-in icon and View All.
- Click Pearson Links.
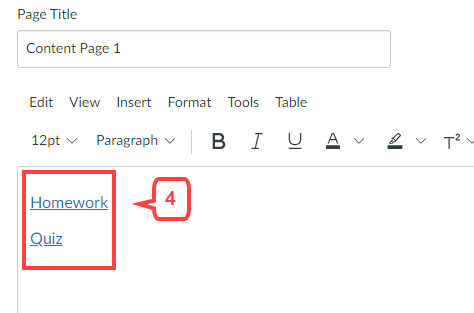
- Select the content you want to add and click Add links.
- Pearson content links will be added in the text box.
Macmillan Learning
Option 1: Add into a module using External Tool option- Click Home or Modules in the course navigation menu to access Modules index page.
- Add a new Module by clicking on + Module button located in the top right part of the screen or go to an existing module.
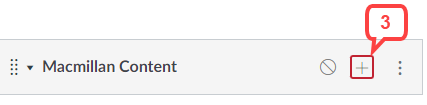
- Click + in the module header.
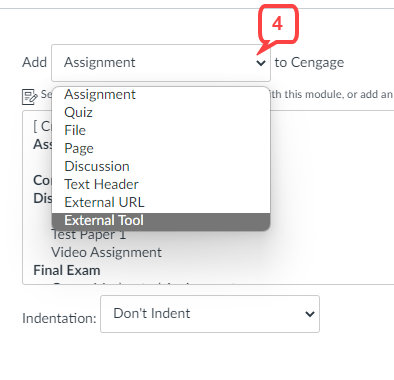
- Click on the arrow and select External Tool.
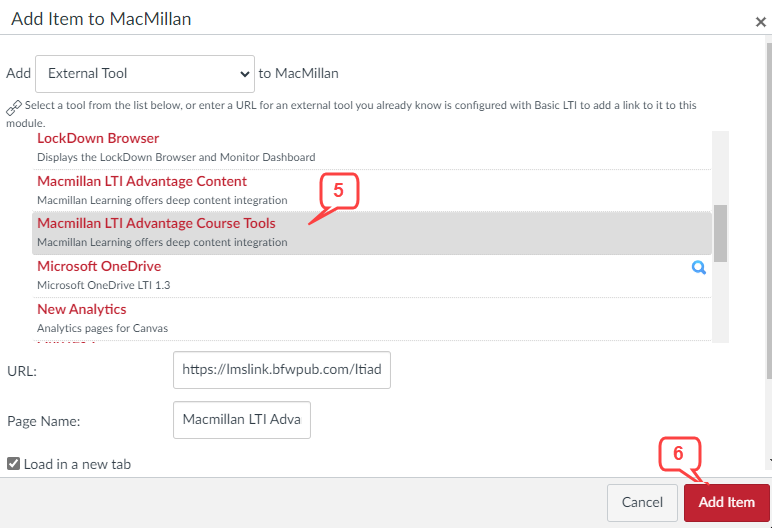
- Click Macmillan LTI Advantage Course Tools. Do not select Macmillan LTI Advantage Content because that will produce an error.
- You will be taken back to the External Tool screen with Macmillan information. Click Add Item.
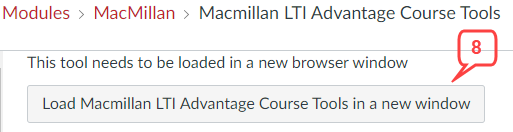
- The tool will appear in the module. Click Macmillan LTI Advantage Course Tools.
- Click Load Macmillan LTI Advantage Course Tools in a new window.
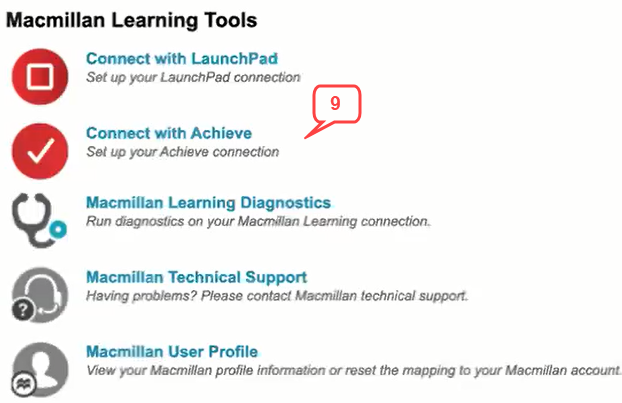
- Click on the product you are using, which will likely be Achieve.
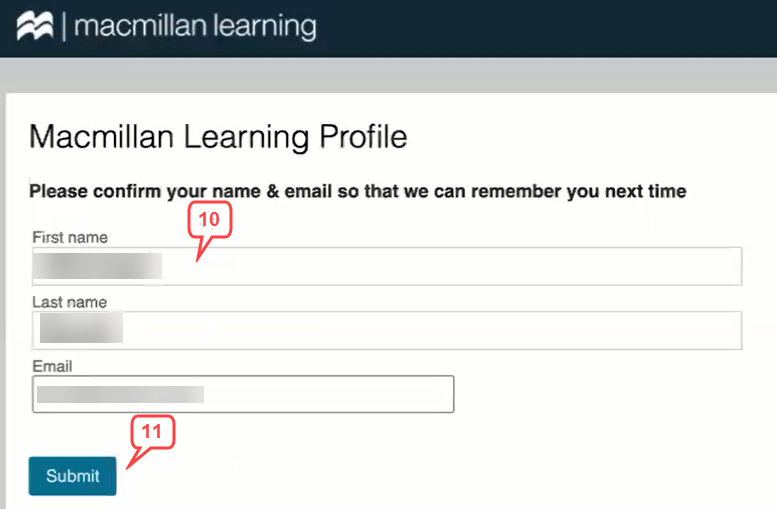
- Confirm the name and email matches the email you have used to create the Macmillan course.
- Click Submit.
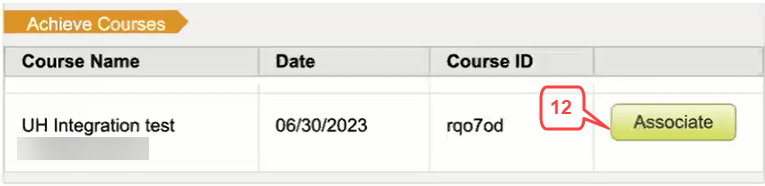
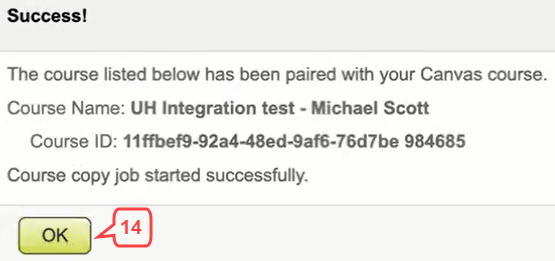
- Click Associate.
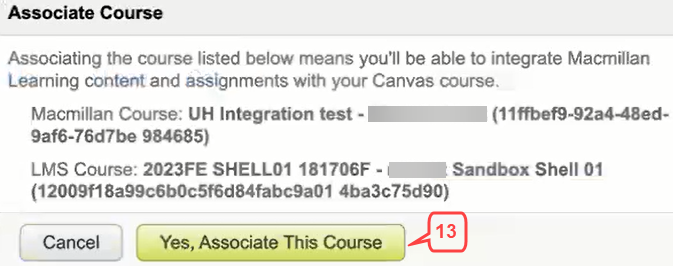
- Click Yes, Associate This Course.
- Click OK.
- The next screen will confirm your course is associated.

Option 2: Add as a module
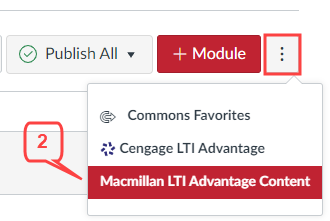
- Click Home or Modules in the course navigation menu on the left.
- Click the 3 dots located in the top right part of the page and select Macmillan LTI Advantage Content.
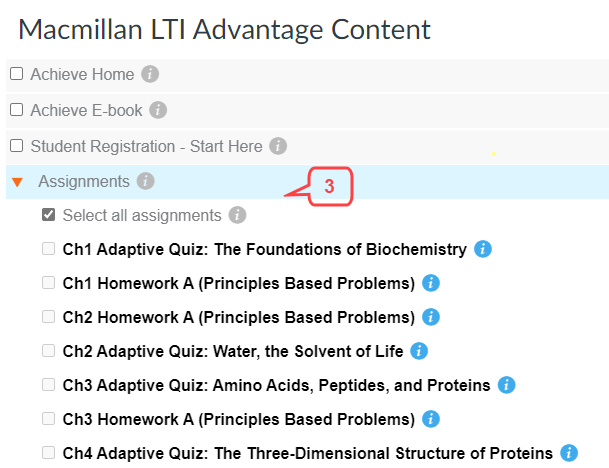
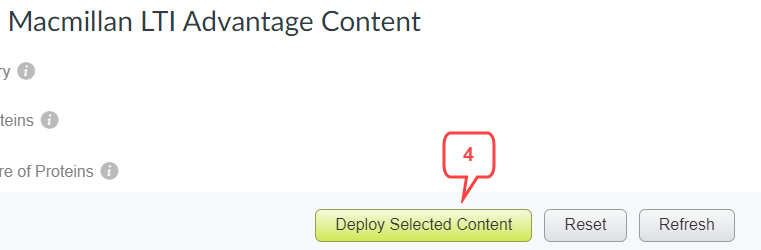
- The only folder to use on this page is the Assignments folder. You can select one or a group of items at once.
- Scroll down to the bottom and click Deploy Selected Content button.
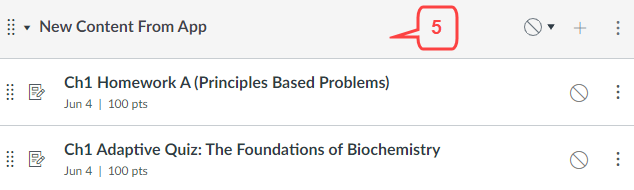
- The new content will appear in a module called ‘New Content From App’.
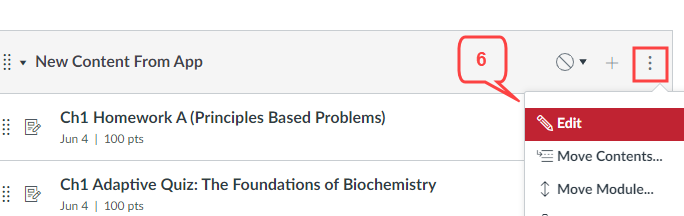
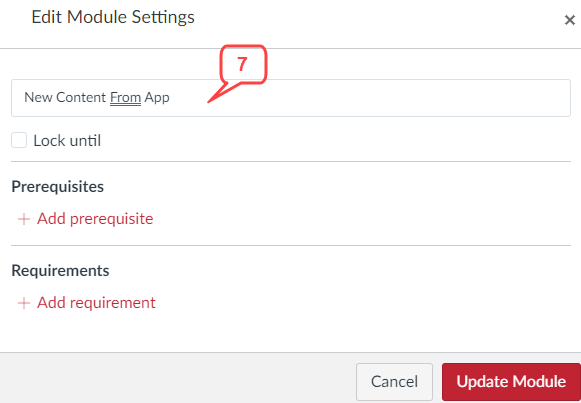
- To edit the name of the module, click 3 dots in the header and select Edit.
- Edit Module Settings screen will pop up. Edit the name and other settings as needed.
- You can also move the items from this module to another module by clicking the 3 dots and selecting Move Contents.
- All the assignments added to the module will also be shown on the Assignments page.

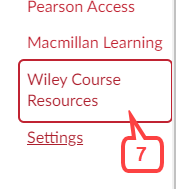
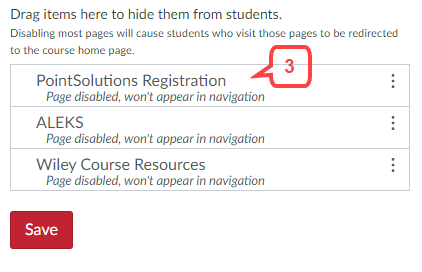
Wiley Course Resources
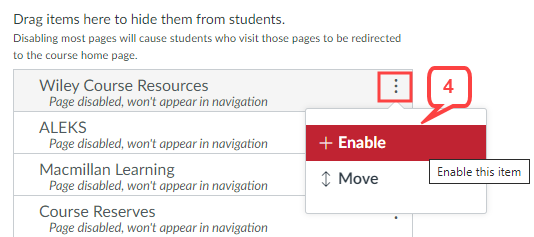
Option 1: Add to course navigation- Click Settings located in the course navigation menu on the left.
- Click the Navigation tab located on the top.
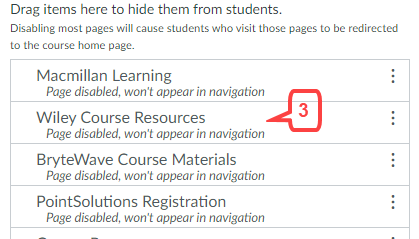
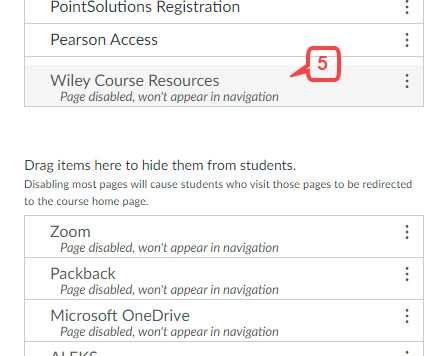
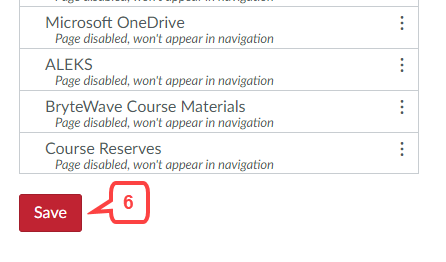
- Scroll down to the hidden set of items and look for Wiley Course Resources.
- Click the 3 dots next to and select Enable. Wiley will be placed in the available set of items.
- You can also drag and drop the item into the available set of items.
- Click Save.
- Wiley Course Resources will appear in the course navigation menu.

Option 2: Add as an external tool in an assignment
- Click Assignments in the course navigation menu to access Modules index page.
- Click + Assignment button to create a new assignment.
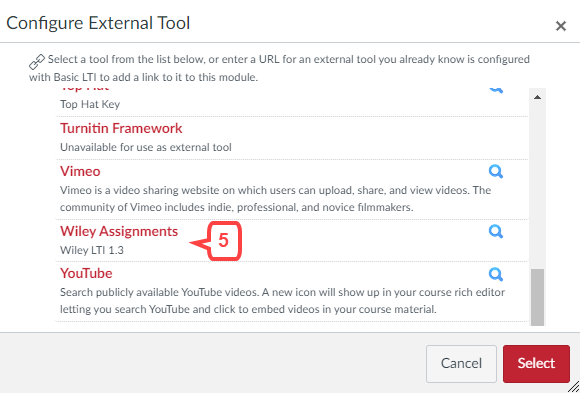
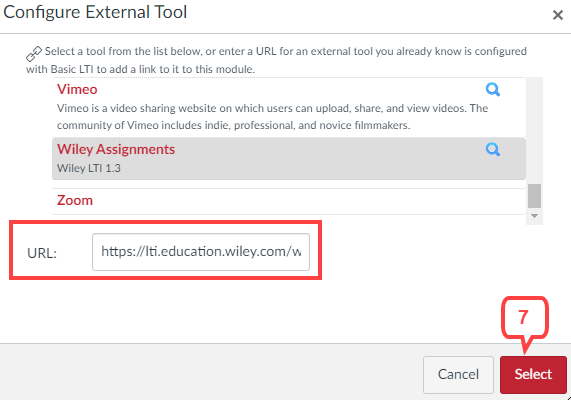
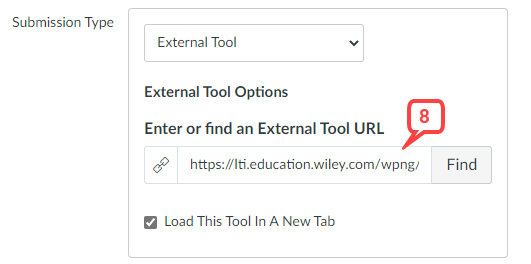
- For the Submission Type field, click the arrow and select External Tool.
- Click Find.
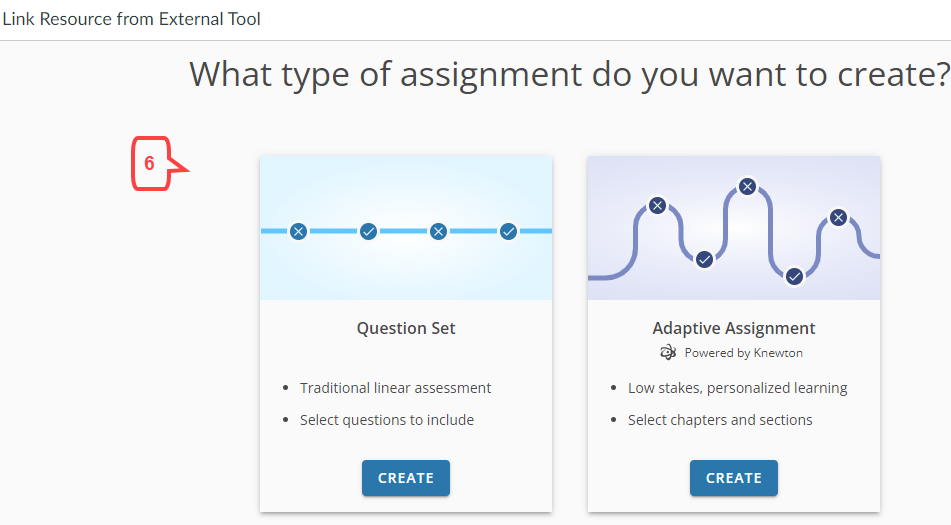
- Click Wiley Assignments.
- Follow the prompts to select content.
- You will be taken back to the External Tool screen with Wiley information. Click Select.
- An External Tool URL will be added in the Submission Type box.
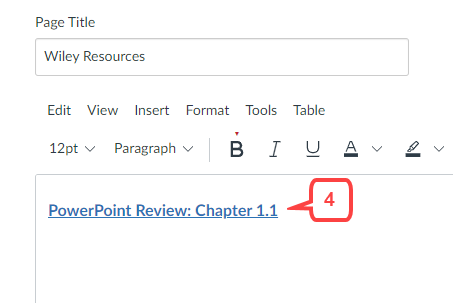
Option 3: Access in Rich Content Editor
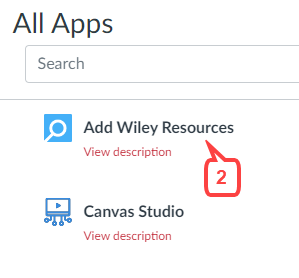
- Tools, such as, Pages, Assignments, Announcements provide a rich content editor that has a ‘plug-in’ for applications. Click the plug-in icon and View All.
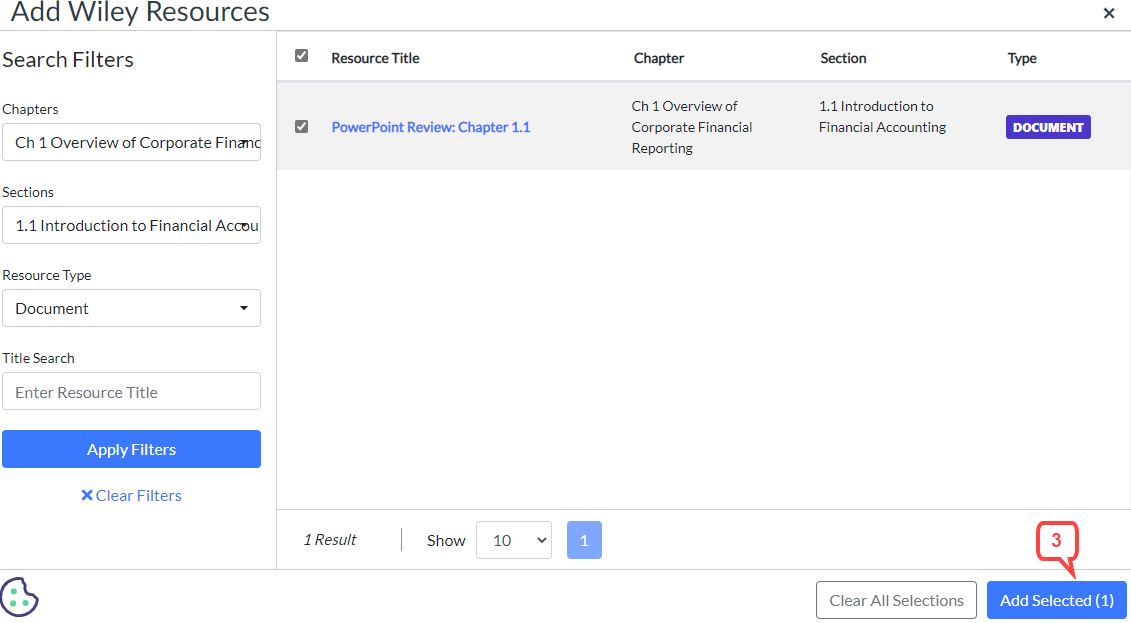
- Click Add Wiley Resources.
- Follow the prompts to select content and click Add Selected.
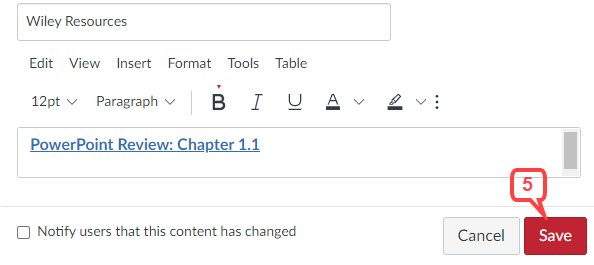
- Wiley content links will be added in the text box.
- When you have completed adding content, click Save.
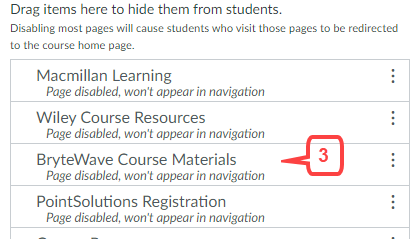
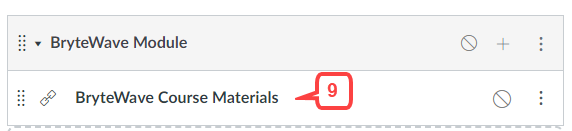
BryteWave Course Materials
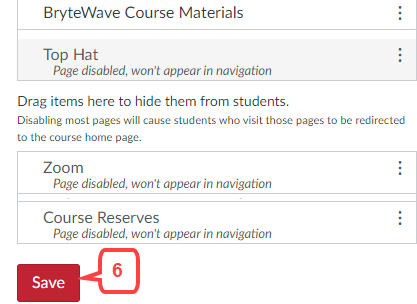
Option 1: Add to course navigation- Click Settings located in the course navigation menu on the left.
- Click the Navigation tab located on the top.
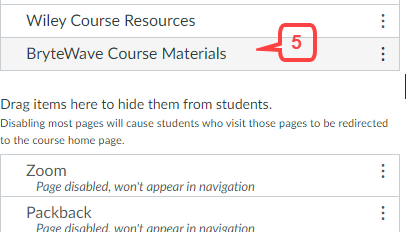
- Scroll down to the hidden set of items and look for BryteWave Course Materials.
- Click the 3 dots next to and select Enable. BryteWave will be placed in the available set of items.
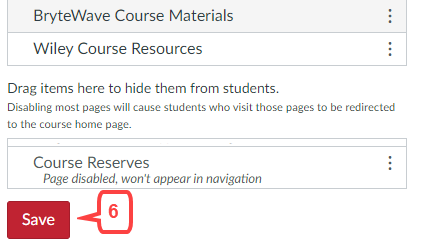
- You can also drag and drop the item into the available set of items.
- Click Save.
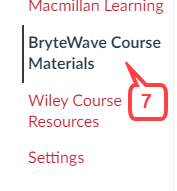
- BryteWave Course Materials will appear in the course navigation menu.
Option 2: Add into a module using External Tool option
- Click Home or Modules in the course navigation menu to access Modules index page.
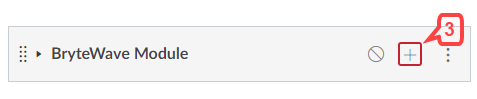
- Add a new Module by clicking on + Module button located in the top right part of the screen or go to an existing module.
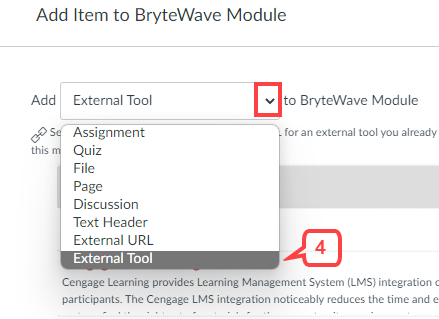
- Click+ in the module header.
- Click on the arrow and select External Tool.
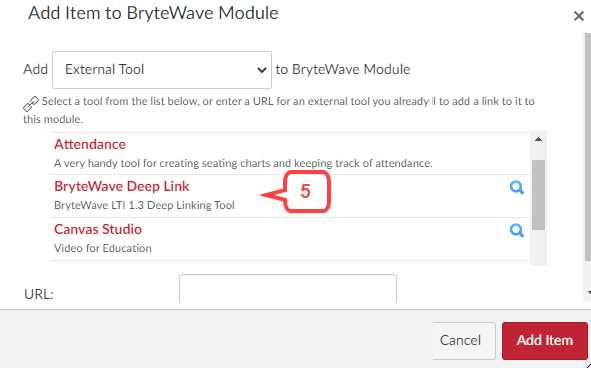
- Click BryteWave Deep Link.
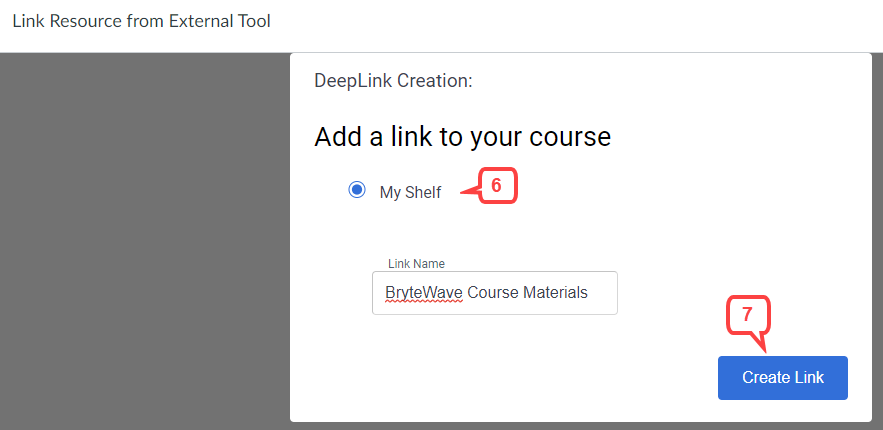
- ‘Link Resource from External Tool’ window will pop up. Select My Shelf.
- Click Create Link.
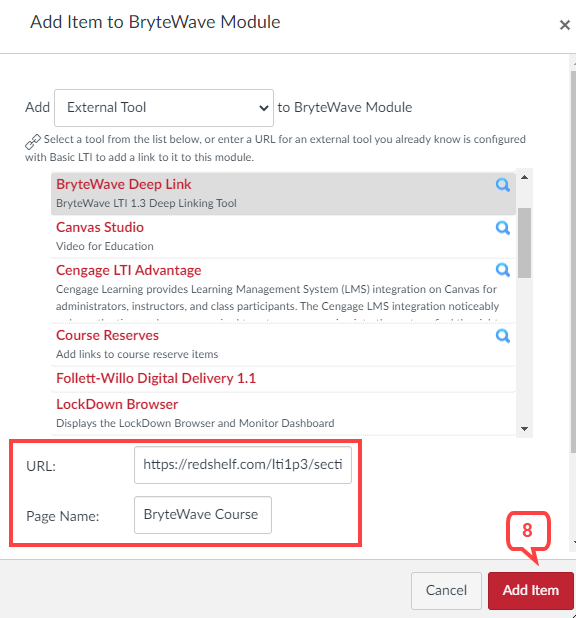
- You will be taken back to the External Tool screen with BryteWave information. Click Add Item.
- The items will be added to the module.
Option 3: Add as an external tool in an assignment
- Click Assignments in the course navigation menu to access Assignments page.
- Click + Assignment button to create a new assignment
- For the Submission Type field, click the arrow and select External Tool.
- Click Find.
- Click BrtyeWave Deep Link.
- The URL field will be populated with the redshelf link. Click Select.
- An External Tool URL will be added in the Submission Type box.


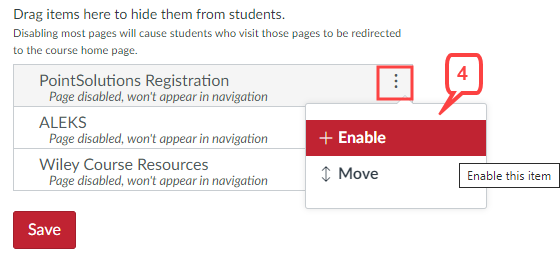
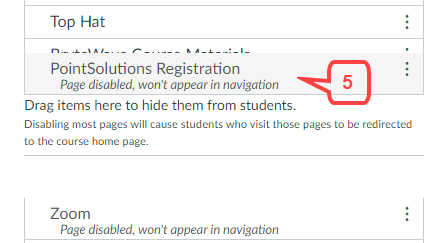
PointSolutions Registration
Option 1: Add to course navigation- Click Settings located in the course navigation menu on the left.
- Click the Navigation tab located on the top.
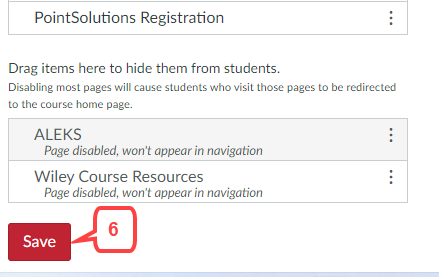
- Scroll down to the hidden set of items and look for PointSolutions Registration.
- Click the 3 dots and select Enable. PointSolutions Registration will be placed in the available set of items.
- You can also drag and drop the item into the available set of items.
- Click Save.
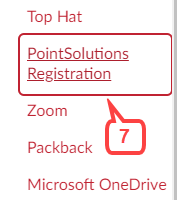
- PointSolutions Registration will appear in the course navigation menu.
Option 2: Add into a module using External Tool option
- Click Home or Modules in the course navigation menu to access Modules index page.
- Add a new Module by clicking on + Module button located in the top right part of the screen or go to an existing module.
- Click+in the module header.
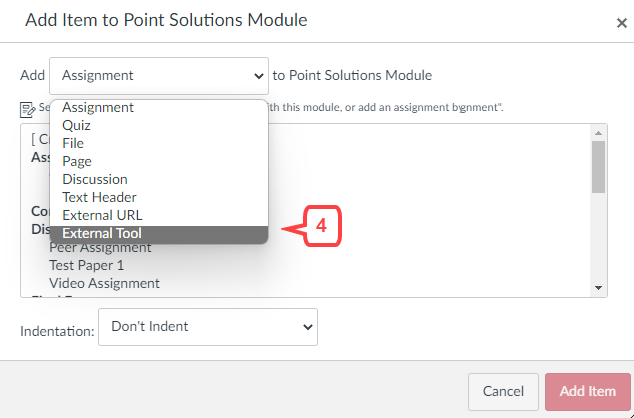
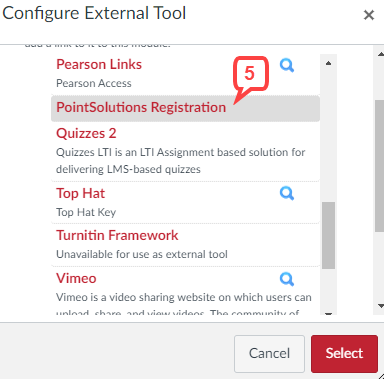
- Click on the arrow and select External Tool.
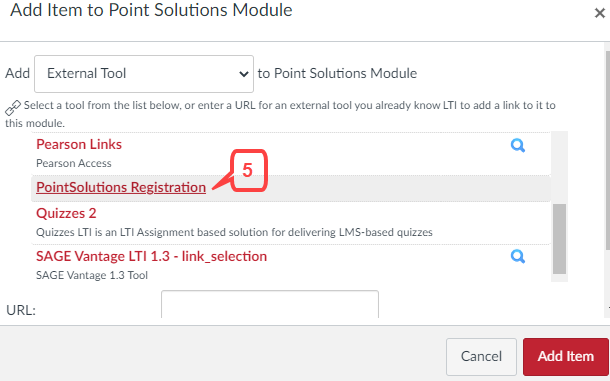
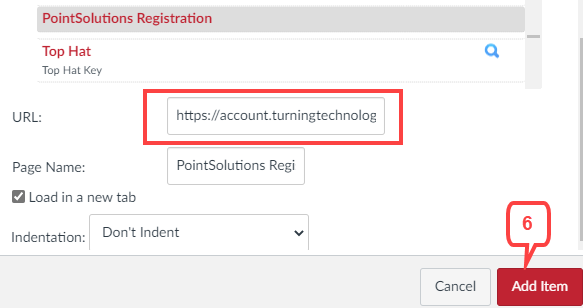
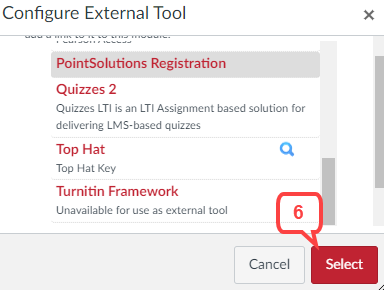
- Click PointSolutions Registration.
- The URL field will be populated with turning technology url. Click Add Item.
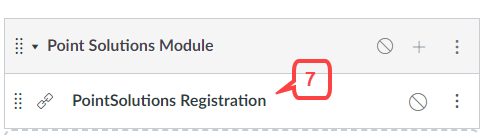
- PointSolutions Registration link will be added to the module.

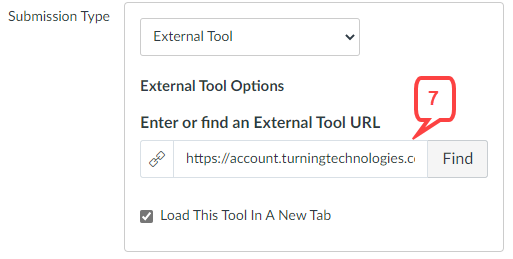
Option 3: Add as an external tool in an assignment
- Click Assignments in the course navigation menu to access Modules index page.
- Click + Assignment button to create a new assignment.
- For the Submission Type field, click the arrow and select External Tool.
- Click Find.
- Click Point Solutions.
- Click Select.
- A turning technologies URL will be added in the Submission Type box.
Top Hat
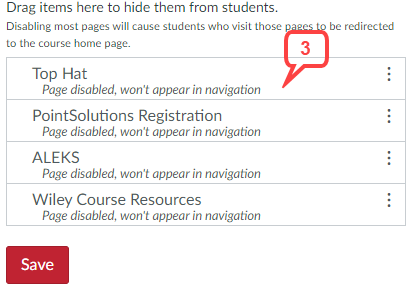
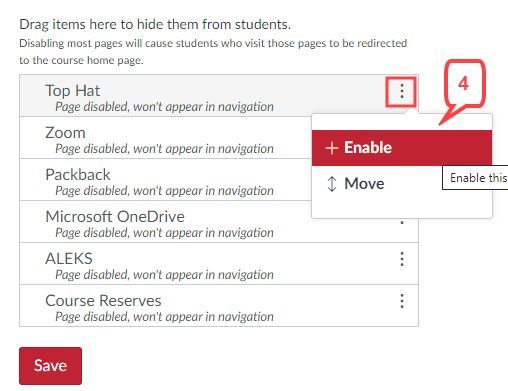
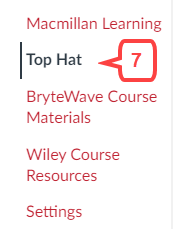
Option 1: Add to course navigation- Click Settings located in the course navigation menu on the left.
- Click the Navigation tab located on the top.
- Scroll down to the hidden set of items and look for Top Hat.
- Click the 3 dots and select Enable. Top Hat will be placed in the available set of items.
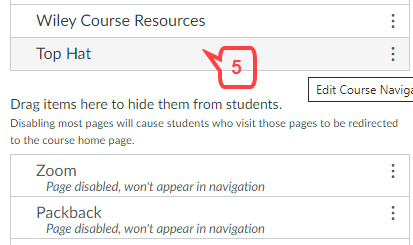
- You can also drag and drop the item into the available set of items.
- Click Save.
- Top Hat will appear in the course navigation menu.
Option 2: Add into a module
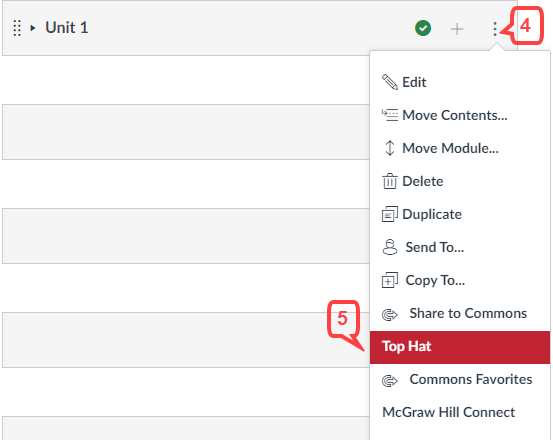
- Click Home or Modules in the course navigation menu on the left.
- Add a new module by clicking +Module button located in the top right part of the screen. If you are using an existing module, go to step 4.
- Follow the prompts to add a new module.
- Click on the 3 dots located in the header area of the module.
- Select Top Hat from the drop-down menu.
- Top Hat will load in a new window.

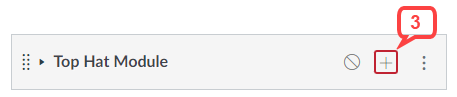
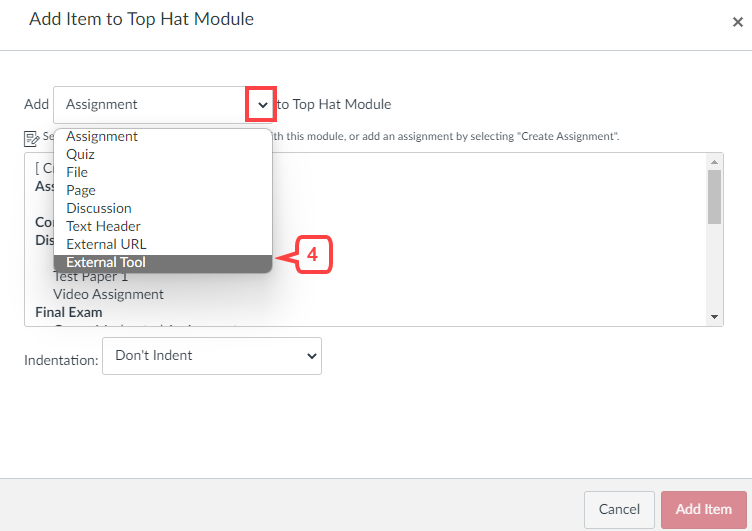
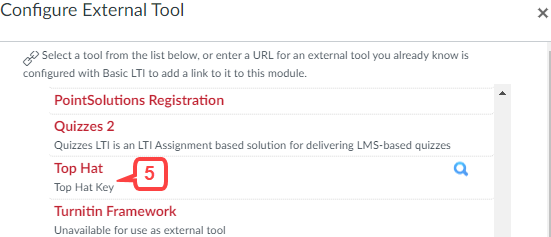
Option 3: Add into a module using External Tool option
- Click Home or Modules in the course navigation menu to access Modules index page.
- Add a new Module by clicking on + Module button located in the top right part of the screen or go to an existing module.
- Click+in the module header.
- Click on the arrow in the Add field and select External Tool.
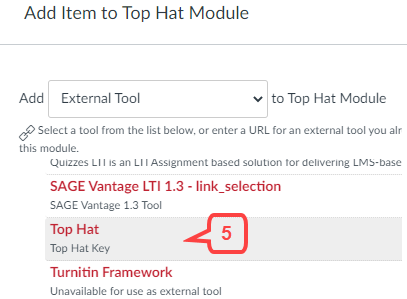
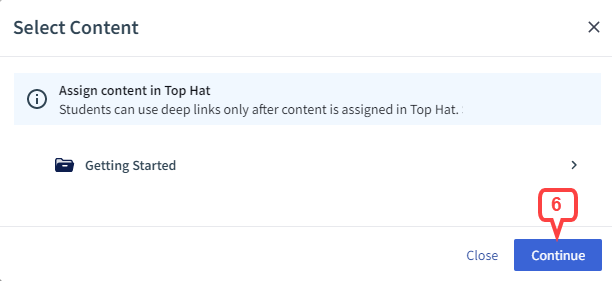
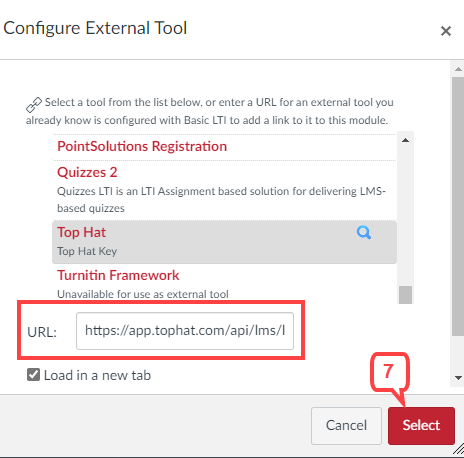
- Click Top Hat.
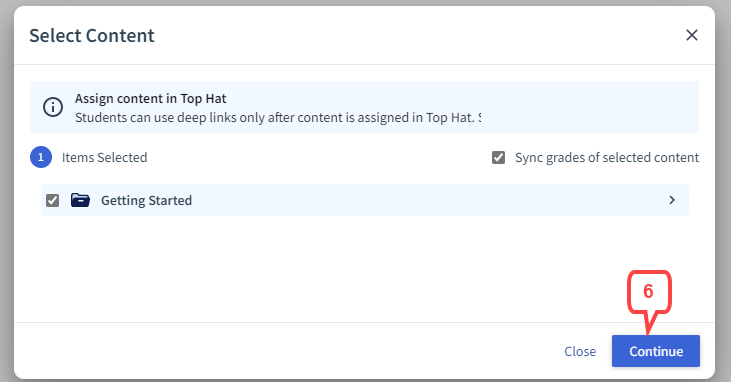
- Follow the prompts to select content and click Continue.
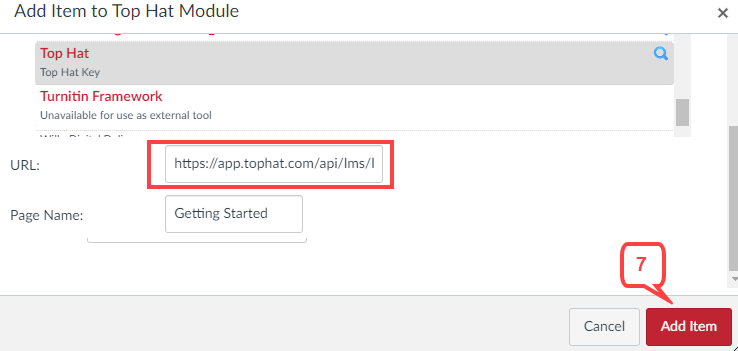
- Top Hat URL will be added to the URL field. Click Add Item.
- Top Hat content will be added to the module.
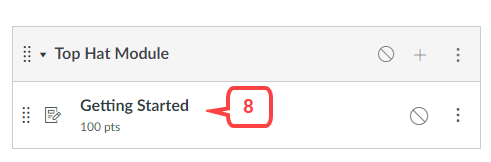
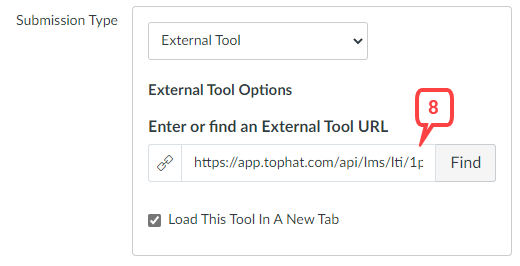
Option 4: Add as an external tool in an assignment
- Click Assignments in the course navigation menu to access Modules index page.
- Click + Assignment button to create a new assignment.
- For the Submission Type field, click the arrow and select External Tool.
- Click Find.
- Click Top Hat.
- Top Hat will open in a new tab. Follow prompts to select content and click Continue.
- You will be taken back to the External Tool screen with Top Hat information. Click Select.
- A Top Hat URL will be added in the Submission Type box.
Norton Learning Tools
Option 1: Add as an external tool in an assignment
- Click Assignments in the course navigation menu to access Assignments page.
- Click + Assignment button to create a new assignment.
- For the Submission Type field, click the arrow, and select External Tool.
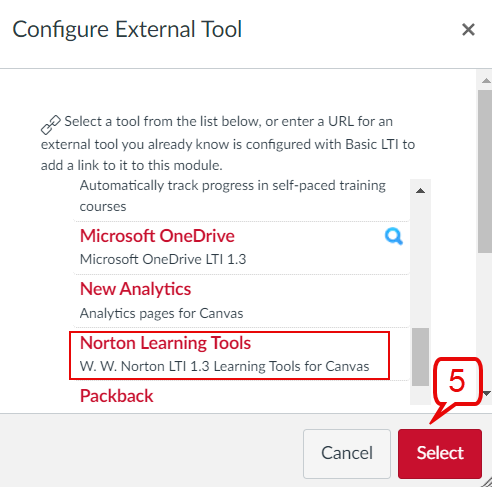
- Click Find.
- Click Norton Learning Tools and click Select.
- You will be taken back to the External Tool screen with Norton information in the External URL field.
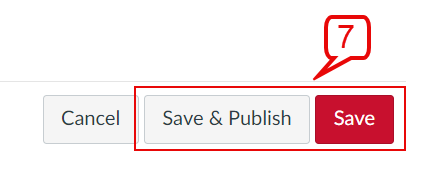
- Click Save or Save & Publish to create the assignment.
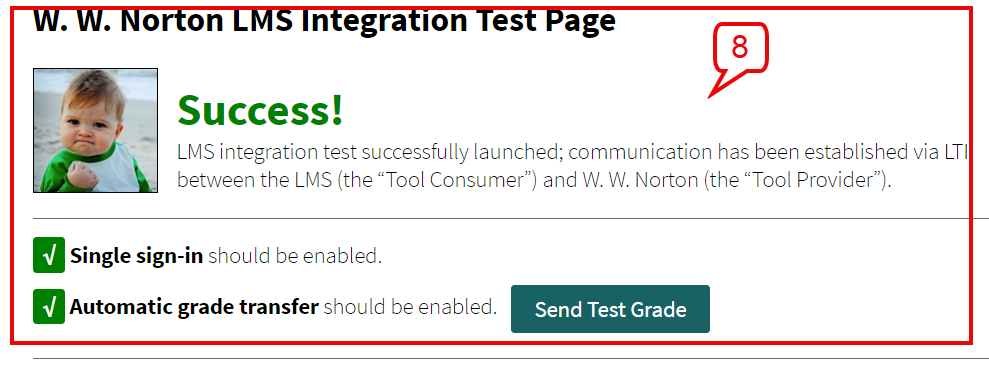
- Norton integration page will load in the window.